Commercial Products
Open Source
Securing Terracotta Clusters with SSL
Introduction
Secure Sockets Layer (SSL) encryption and certificate-based authentication can be used to secure enterprise versions of Terracotta clusters.
Security in a Terracotta cluster includes both server-server connections and client-server connections. Note that all connections in a secured cluster must be secure; no insecure connections are allowed, and therefor security must be enabled globally in the cluster. It is not possible to enable security for certain nodes only.
Overview
Each Terracotta server utilizes the following types of files to implement security:
- Java keystore – Contains the server's private key and public-key certificate. Protected by a keystore/certificate-entry password.
- Keychain – Stores passwords, including to the server's keystore and its entries.
- Authorization – A .ini file with password-protected roles for servers and clients that connect to the server.
The standard Java cacerts file, located in ${JAVA_HOME}java.home/lib/security by default, is a system-wide repository for Certificate Authority (CA) root certificates included with the JDK. These certificates can play a part in certificate chains. Java documentation recommends that the cacerts file be protected by changing its default password and file permissions.
|
Each Terracotta client also has a keychain file that stores the password it uses to authenticate with the server.
The following diagram illustrates the flow of security information—and that information's origin in terms of the files described above—during initial cluster connections:
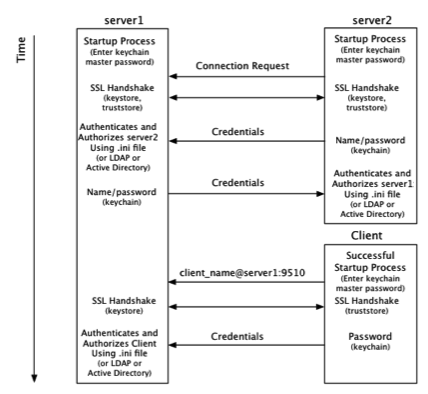
From a Terracotta server's point of view, security checks take place at startup and at the time a connection is made with another node on the cluster:
- At startup, server1 requires a password to be entered directly from the console to complete its startup process.
- On receiving a connection request from server2, server1 authenticates server2 using stored credentials and a certificate stored in a keystore. Credentials are also associated with a role that authorizes server2. The process is symmetrical: server2 authenticates and authorizes server1.
- On receiving a connection request from a Terracotta client, server1 authenticates and authorizes the client using stored credentials and associated roles. The client has to authenticate with only one active server in the cluster.
From a Terracotta client's point of view, security checks occur at the time the client attempts to connect to an active server in the cluster:
The client uses a server URI that includes the client username.
A typical (non-secure) URI is
<server-address>:<port>. A URI that initiates a secure connection takes the form<client-username>@<server-address>:<port>.The client sends a password fetched from a local keychain file. The password is associated with the client username.
The following configuration snippet is an example of how security could be set up for the servers in the illustration above:
<tc:tc-config xmlns:tc="http://www.terracotta.org/config">
...
  <servers secure=”true”>
    <server host="123.456.789.1" name="server1">
    ...
      <security>
        <ssl>
          <certificate>jks:server1alias@/the/path/keystore-file.jks</certificate>
        </ssl>
        <keychain>
          <class>com.terracotta.management.keychain.FileStoreKeyChain</class>
          <url>file:///%(user.dir)/server1keychain.tkc</url>
        </keychain>
        <auth>
          <realm>com.tc.net.core.security.ShiroIniRealm</realm>
          <url>file:///%(user.dir)/myShiroFile.ini</url>
          <user>server1username</user>
        </auth>
      </security>
   ...
   </server>
    <server host="123.456.789.2" name="server2">
    ...
      <security>
        <ssl>
          <certificate>jks:server2alias@/the/path/keystore-file.jks</certificate>
        </ssl>
        <keychain>
          <class>com.terracotta.management.keychain.FileStoreKeyChain</class>
          <url>file:///%(user.dir)/server2keychain.tkc</url>
        </keychain>
        <auth>
          <realm>com.tc.net.core.security.ShiroIniRealm</realm>
          <url>file:///%(user.dir)/myShiroFile.ini</url>
          <user>server2username</user>
        </auth>
      </security>
   ...
   </server>
   ...
 </servers>
...
</tc:tc-config>
See the configuration section below for more information on the configuration elements in the example.
Setting Up Server Security
To set up security on a Terracotta server, follow the steps in each of these procedures:
NOTE: Script names in the examples given below are for *NIX systems. Equivalent scripts are available for Microsoft Windows in the same locations. Simply substitute the .bat extension for the .sh extension shown and convert path delimiters as appropriate.
Create the Server Certificate and Add It to the Keystore
Each Terracotta server must have a keystore file containing a digital certificate and the associated private key. This document assumes that you will use self-signed certificates. Self-signed certificates do not carry a digital signature from an official CA.
IMPORTANT SECURITY CONSIDERATION!: Self-signed certificates might be less safe than CA-signed certificates because they lack third-party identity verification and do not carry a digital signature from an official CA. Your organization might already have policies and procedures in place regarding the generation and use of digital certificates and certificate chains, including the use of certificates signed by a Certificate Authority (CA). To follow your organization's policies and procedures regarding using digital certificates, you might need to adjust the procedures outlined in this document.
When used for a Terracotta server, the following conditions must be met for certificates and their keystores:
- The keystore must be a Java keystore (JKS) compatible with JDK 1.6 or higher.
- The certificate must be keyed with the alias named in the value of the
<certificate>element of the server's configuration. - The password securing the certificate must match the keystore's main password. In other words, the store password and key passwords must be identical.
- If using a self-signed certificate (not one signed by a trusted CA), certain settings must be enabled.
If you have a keystore in place, but the server certificate is not already stored in the keystore, you must import it into the keystore. If the keystore does not already exist, you must create it.
Self-Signed Certificates Using Java Keytool
For testing purposes, or if you intend to use self-signed certificates, you can use the Java keytool command. Using this command will create the public-private key pair, with the public key as part of a self-signed certificate. The following could be used to generate a certificate for the server called "server1" from the configuration example above:
keytool -genkey -keystore keystore-file.jks -alias server1alias -storepass server1pass -keypass server1pass
Note that the values passed to -storepass and -keypass match. There are a number of other keytool options to consider, including -keyalg (cryptographic algorithm; default is DSA) and -validity (number of days until the certificate expires; default is 90). These and other options are dependent on your environment and security requirements. See the JDK documentation for more information on using the keytool.
After you issue the keytool command, a series of identity prompts (distinguished-name fields based on the X.500 standard) follow before the certificate is created. The values for these prompts could instead be given on the command line using the -dname option.
Create a keystore and certificate for each Terracotta server.
Using Self-Signed Certificates
Self-signed certificates do not carry a digital signature from an official CA. While it is possible to use self-signed certificates, they may be less safe than CA-signed certificates because they lack third-party identity verification.
Set Up the Server Keychain
The keystore and each certificate entry are protected by passwords stored in the server keychain file. The location of this file is used in the value of the <url> element under the <keychain> element of the server configuration.
In the configuration example, at the startup of server1 a keychain file called server1keychain.tkc is searched for in the user's (process owner's) home directory.
The keychain file should have the following entries:
- An entry for the local server's keystore entry.
- An entry for every server that will connect to the local server.
Entries are created using the keychain script found in the Terracotta kit's bin directory.
Creating an Entry for the Local Server
Create an entry for the local server's keystore password:
bin/keychain.sh <keychain-file> <certificate-URI>
where <keychain-file> is the file named in the server configuration's <keychain>/<url> element, and <certificate-URI> is the URI value in the server configuration's <ssl>/<certificate> element.
If the keychain file does not exist, add the -c option to create it:
bin/keychain.sh -c <keychain-file> <certificate-URI>
You will be prompted for the keychain file's password, then for a password to associate with the URI. For the URI, you must enter the same password used to secure the server's certificate in the keystore.
For example, to create an entry for server1 from the configuration example above, enter:
bin/keychain.sh server1keychain.tkc jks:server1alias@keystore-file.jks

Terracotta Management Console - Keychain Client
Open the keychain by entering its master key:   xxxxxxx
Enter the password you wish to associate with this URL:   server1pass
Confirm the password to associate with this URL:   server1pass
Password for jks:server1alias@keystore-file.jks successfully stored
Creating Entries for Remote Servers
Entries for remote servers have the format tc://<user>@<host>:<group-port>. Note that the value of the <user> element is not related to the user running as process owner.
For example, to create an entry for server2 in server1's keychain, use:
bin/keychain.sh server1keychain.tkc tc://server2username@123.456.789.2:9530
If the keychain file does not exist, use the -c option:
bin/keychain.sh -c server1keychain.tkc tc://server2username@123.456.789.2:9530
You will be prompted for the keychain file's password, then for a password to associate with the entry server2username@123.456.789.2:9530.
An entry for server1 must also be added to server2's keychain:
bin/keychain.sh server2keychain.tkc tc://server1@123.456.789.1:9530
To use a copy of the same keychain file on every server, be sure to create an entry for the local server as well as every server that will connect to it.
Set Up Authentication
Servers and clients that connect to a secured server must have authentication (usernames/passwords) and authorization (roles) defined. By default, this is set up using the usermanagement script, located in the Terracotta kit's bin directory. This script also creates the .ini file that contains the required usernames and roles (associated passwords are stored in the keychain file).
All nodes in a secured Terracotta cluster must have an entry in the server's .ini file:
- The local server itself
- All other servers
- All clients
Use the usermanagement script with the following format:
bin/usermanagement.sh -c <file> <username> terracotta
where -c <file> is required only if the file does not already exist. For servers, the <username> will be used as the value configured in <security>/<auth>/<user>. For clients, the username must match the one used to start the client. Note that the role, terracotta, is appropriate for Terracotta servers and clients.
Configure Server Security
Security for the Terracotta Server Array is configured in the Terracotta configuration file (tc-config.xml by default). The following is an example security configuration:
<tc:tc-config xmlns:tc="http://www.terracotta.org/config">
...
  <servers secure=”true”>
    <server host="123.456.789.1" name="server1">
    ...
      <security>
        <ssl>
          <certificate>jks:server1alias@/the/path/keystore-file.jks</certificate>
        </ssl>
        <keychain>
          <class>com.terracotta.management.keychain.FileStoreKeyChain</class>
          <url>file:///%(user.dir)/server1keychain.tkc</url>
        </keychain>
        <auth>
          <realm>com.tc.net.core.security.ShiroIniRealm</realm>
          <url>file:///%(user.dir)/myShiroFile.ini</url>
          <user>server1username</user>
        </auth>
      </security>
   ...
   </server>
   ...
 </servers>
...
</tc:tc-config>
Every server participating in an SSL-based secured cluster must have a <security> block wherein security-related information is encapsulated and defined. Every server in the cluster must have available the keystore, keychain, and .ini files named in the configuration.
The following table defines selected security-related elements and attributes shown in the configuration example.
| Name | Definition | Notes |
|---|---|---|
| secure | Attribute in <servers> element. Enables SSL security for the cluster. DEFAULT: false. | Enables/disables SSL-based security globally. |
| certificate | Element specifying the location of the server's authentication certificate and its containing keystore file. The format for the certificate-keystore location is jks:alias@/path/to/keystore. "alias" must match the value used to key the certificate in the keystore file. | Only the JKS type of keystore is supported. |
| class | Element specifying the class defining the keychain file. If a class is not specified, com.terracotta.management.keychain.FileStoreKeyChain is used. |
|
| url | The URI for the keychain file (when under <keychain>) or for the Realm configuration (.ini) file (when under <auth>). These URIs are passed to the keychain or realm class to specify the keychain or authentication file, respectively. | These files are created and managed with the keychain and usermanagement scripts. |
| user | The username that represents this server and is authenticated by other servers. This name is part of the credentials stored in the .ini file. | Defaults to "terracotta". |
Enabling SSL on Terracotta Clients
Terracotta clients do not require any specific configuration to enable SSL connections to a Terracotta Server Array.
NOTE: Script names in the examples given below are for *NIX systems. Equivalent scripts are available for Microsoft Windows in the same locations. Simply substitute the .bat extension for the .sh extension shown and convert path delimiters as appropriate.
To enable SSL security on the client, prepend the client username part to the Terracotta server URL the client uses to connect to the cluster. This should be the URL of an active server that has the client's credentials in its .ini file. The format of this security URL is <client-username>@<host>:<dso-port>. Prepending the username automatically causes the client to initiate an SSL connection.
If the client has username tcclient, for example, and attempts to connect to the server in the configuration example, the URI would be:
tcclient@123.456.789.1:9510
This type of URL replaces the non-secure URL (<host>:<dso-port>) used to start clients in non-SSL clusters.
Both the client username and the corresponding password must match the those in the server's .ini file. The username is included in the URL, but the password must come from a local keychain-file entry that you create.
Create a Keychain Entry
The Terracotta client must have a keychain file with a URI entry for an active Terracotta server. The format for the URI uses the "tc" scheme:
tc://user@<IP address or hostname>:<port>
where user must match the value configured in <security>/<auth>/<user> in the server's security configuration. An entry for the server in the example configuration should look like the following:
tc://server1@123.456.789.1:9510
Use the keychain script in the Terracotta kit to add the entry:
bin/keychain.sh clientKeychainFile tc://server1@123.456.789.1:9510
If the keychain file does not already exist, use the -c flag to create it:
bin/keychain.sh -c clientKeychainFile tc://server1@123.456.789.1:9510
The Terracotta client searches for the keychain file in the following locations:
- %(user.home)/.tc/mgmt/keychain
- %(user.dir)/keychain.tkc
- The path specified by the system property
com.tc.security.keychain.url
When you run the keychain script, the following prompt should appear:
Terracotta Management Console - Keychain Client
KeyChain file successfully created in clientKeychainFile
Open the keychain by entering its master key:
Enter the master key, then answer the prompts for the secret to be associated with the server URI:
Enter the password you wish to associate with this URL:
Password for tc://server1@123.456.789.1:9510 successfully stored
Ensure that the password associated with the server's URL matches the password stored in the server's .ini file for that client. The script cannot verify the match.
Running a Secured Server
Start a server in a secure Terracotta cluster using the start-tc-server script as usual. After initial startup messages, you will be prompted for the password to the server's keychain. Once the password is entered, the server should continue its startup as normal.
Confirm Security Enabled
You can confirm that a server in a number of ways:
- Look for the startup message
Security enabled, turning on SSL. - Search for log messages containing "SSL keystore", "HTTPS Authentication enabled", and "Security enabled, turning on SSL".
- Attempt to make JMX connections to the server—these should fail.
Troubleshooting
You may encounter any of the following errors at startup:
RuntimeException: Couldn't access a Console instance to fetch the password from!
This results from using "nohup" during startup. The startup process requires a console for reading password entry.
TCRuntimeException: Couldn't create KeyChain instance ...
The keychain file specified in the Terracotta configuration cannot be found. Check for the existence of the file at the location specified in <keychain>/<url>.
RuntimeException: Couldn't read from file ...
This error appears just after an incorrect password is entered for the keychain file.
RuntimeException: No password available in keyChain for ...
This error appears if no keychain password entry is found for the server's certificate. You must explicitly store the certificate password in the keychain file.
Two Active Servers
Instead of an active-mirror 2-server stripe, both servers assert active status after being started. This error can be caused by neglecting to set the required Java system properties when using self-signed certificates.
No Messages Indicating Security Enabled
If servers start with no errors, but there are no messages indicating that security is enabled, ensure that the <servers> element contains secure="true".