Open Source
Using Encrypted Keychains
Introduction
Note: For a brief overview of Terracotta security with links to individual topics, see Security Overview.
Security the Terracotta Server Array (TSA) is set up using Terracotta configuration, tools provided in the Terracotta kit, standard Java tools, and public key infrastructure (via standard digital X.509 digital certificates). This setup process is described in Securing Terracotta Clusters.
By default, the keychain script that creates Terracotta keychain files uses an obfuscation scheme to protect passwords. This scheme is adequate for development environments or environments where keychain-file security is already assured.
If your environment requires stronger protection for keychain files, use the encryption scheme described in this page. The encryption scheme requires a master password each time the keychain file is accessed.
Note: Except for the keychain setup, you must follow the setup instructions, including for authentication and SSL, as described in Securing Terracotta Clusters.
The following diagram shows where the master password is required in the startup process of a Terracotta cluster.
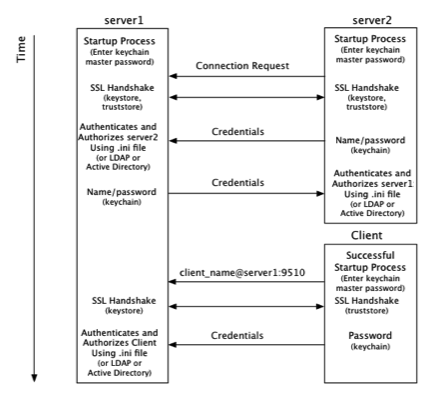
From the point of view of the Terracotta server, security checks take place at startup and at the time a connection is made with another node on the cluster:
- At startup, server1 requires a password to be entered directly from the console to complete its startup process. The password can also be read from a file to avoid manual entry.
- A connection request from server2 initiates the process of establishing a secure connection using SSL.
- Server1 authenticates server2 using stored credentials. Credentials are also associated with a role that authorizes server2. The process is symmetrical: server2 authenticates and authorizes server1.
- A connection request from a Terracotta client initiates the process of establishing a secure connection using SSL.
- Server1 authenticates and authorizes the client using stored credentials and associated roles. Because a client might communicate with any active server in the cluster during its lifetime, the client must be able to authenticate with any active server. Because active servers can fail over to mirror servers, each client should be able to authenticate against all servers in the cluster.
From the point of view of a Terracotta client, security checks occur at the time the client attempts to connect to an active server in the cluster:
The client uses a server URI that includes the client username.
A typical (non-secure) URI is
<server-address>:<port>. A URI that initiates a secure connection takes the form<client-username>@<server-address>:<port>.A secure connection using SSL is established with the server.
- The client sends a password fetched from a local keychain file. The password is associated with the client username.
Note that the diagram and process shown above are similar to those found in Securing Terracotta Clusters. The main differences, described in this document, concern the use of the keychain file.
Configuration Example
The following configuration snippet is an example of how security could be set up for the servers in the illustration above:
<tc:tc-config xmlns:tc="http://www.terracotta.org/config">
...
  <servers secure="true">
    <server host="172.16.254.1" name="server1">
    ...
      <security>
        <ssl>
          <certificate>jks:server1alias@/the/path/keystore-file.jks</certificate>
        </ssl>
        <keychain>
          <secret-provider>
            com.terracotta.management.security.ConsoleFetchingBackend
          </secret-provider>
          <url>file:///%(user.dir)/server1keychain.tkc</url>
        </keychain>
        <auth>
          <realm>com.tc.net.core.security.ShiroIniRealm</realm>
          <url>file:///%(user.dir)/myShiroFile.ini</url>
          <user>server1username</user>
        </auth>
      </security>
   ...
   </server>
    <server host="172.16.254.2" name="server2">
    ...
      <security>
        <ssl>
          <certificate>jks:server2alias@/the/path/keystore-file.jks</certificate>
        </ssl>
        <keychain>
          <url>file:///%(user.dir)/server2keychain.tkc</url>
        </keychain>
        <auth>
          <realm>com.tc.net.core.security.ShiroIniRealm</realm>
          <url>file:///%(user.dir)/myShiroFile.ini</url>
          <user>server2username</user>
        </auth>
      </security>
   ...
   </server>
   ...
 </servers>
...
</tc:tc-config>
See the configuration section for more information on the configuration elements in the example.
NOTE: Script names in the examples given below are for UNIX and Linux systems. Equivalent scripts are available for Microsoft Windows in the same locations. Replace the the .sh extension with .bat and convert path delimiters as appropriate.
Configuring the Encrypted Server Keychain
By default, keychain files protect stored passwords using an obfuscation scheme. You can override this scheme by explicitly naming the secret provider for encryption:
<secret-provider>com.terracotta.management.security.ConsoleFetchingBackend</secret-provider>
This secret provider is also shown in the configuration example above.
You can override the configured secret provider using the property com.terracotta.SecretProvider. For example, to use obfuscation without changing configuration, use com.terracotta.SecretProvider=com.terracotta.management.security.ObfuscatingSecretProviderBackend.
|
Adding Entries to Encrypted Keychain Files
You must also add entries to the keychain file as described in Securing Terracotta Clusters, but avoid using the -O flag when using the keychain script.
For example, to create an entry for the local server's keystore password, use:
tools/security/bin/keychain.sh <keychain-file> <certificate-URI>
If the keychain file does not exist, add the -c option to create it:
tools/security/bin/keychain.sh -c <keychain-file> <certificate-URI>
You will be prompted for the keychain file's master password, then for a password to associate with the URI. For the URI, you must enter the same password used to secure the server's certificate in the keystore.
For example, to create an entry for server1 from the configuration example above, enter:
tools/security/bin/keychain.sh server1keychain.tkc jks:server1alias@keystore-file.jks

Terracotta Management Console - Keychain Client
Open the keychain by entering its master key:   xxxxxxx
Enter the password you wish to associate with this URL:   server1pass
Confirm the password to associate with this URL:   server1pass
Password for jks:server1alias@keystore-file.jks successfully stored
To create an entry for server2 in server1's keychain, use:
tools/security/bin/keychain.sh server1keychain.tkc tc://server2username@172.16.254.2:9530
Encrypted Client Keychain Files
For clients, set the secret provider with the following property:
com.terracotta.express.SecretProvider=net.sf.ehcache.terracotta.security.ConsoleFetchingSecretProvider
Add entries to the keychain file as described in Securing Terracotta Clusters, but avoid using the -O flag when using the keychain script.
For example:
tools/security/bin/keychain.sh clientKeychainFile tc://client1@172.16.254.1:9510
When you run the keychain script, the following prompt should appear:
Terracotta Management Console - Keychain Client
KeyChain file successfully created in clientKeychainFile
Open the keychain by entering its master key:
Enter the master key, then answer the prompts for the secret to be associated with the server URI:
Enter the password you wish to associate with this URL:
Password for tc://client1@172.16.254.1:9510 successfully stored
Note that the script does not verify the credentials or the server address.
If the keychain file does not already exist, use the -c flag to create it:
tools/security/bin/keychain.sh -c clientKeychainFile tc://client1@172.16.254.1:9510
If creating the keychain file, you will be prompted for a master password. To automate the entry of the master password, see Clients Automatically Reading the Keychain Password.
The Terracotta client searches for the keychain file in the following locations:
- %(user.home)/.tc/mgmt/keychain
- %(user.dir)/keychain.tkc
- The path specified by the system property
com.tc.security.keychain.url
Security With the TMS
If you are using the Terracotta Management Server (TMS), you must set up JMX authentication. Every node in the cluster must have the following entry in its keychain, all locked with the identical secret:
jmx:net.sf.ehcache:type=RepositoryService
In addition, server-server REST-agent communication must also be authorized using a keychain entry using the format jmx://<user>@<host>:<group-port>.
Add entries to the keychain file as described in Securing Terracotta Clusters, but avoid using the -O flag when using the keychain script.
For example, to create an entry for server2 in server1's keychain, use:
tools/security/bin/keychain.sh server1keychain.tkc jmx://server2username@172.16.254.2:9530
Each server must have an entry for itself and one for each other server in the TSA.
Reading the Keychain Master Password From a File
Instead of manually entering the master keychain password at startup, you can set servers and clients to automatically read the password.
Note: Cygwin (on Windows) is not supported for this feature.
Servers Automatically Reading the Keychain Password
Implement the interface
com.terracotta.management.security.SecretProviderBackEnd(located in the JARcom.terracotta:security-keychain) to fetch a password from a given file. For example:package com.foo; import com.terracotta.management.security.SecretProviderBackEnd; import java.io.ByteArrayOutputStream; import java.io.FileInputStream; import java.io.IOException; public class MySecretProvider implements SecretProviderBackEnd { private byte[] bytes; // This method reads the password into a byte array. @Override public void fetchSecret() { try { bytes = readPasswordFile("password.pw"); } catch (IOException ioe) { throw new RuntimeException("Cannot read password from file", ioe); } } private byte[] readPasswordFile(String filename) throws IOException { FileInputStream fis = new FileInputStream(filename); try { byte[] buffer = new byte[64]; ByteArrayOutputStream baos = new ByteArrayOutputStream(); while (true) { int read = fis.read(buffer); if (read == -1) { break; } baos.write(buffer, 0, read); } return baos.toByteArray(); } finally { fis.close(); } } // This method returns the byte array containing the password. @Override public byte[] getSecret() { return bytes; } }Create a JAR containing your implementation (MySecretProvider), then copy it to the BigMemory Max
server/libdirectory.Assuming the new JAR file is called
my-secret-provider.jar, edit the start-tc-server script in the BigMemory Maxserver/binas follows:UNIX/LINUX
Change the line-cp "${TC_INSTALL_DIR}/lib/tc.jar" \to
-cp "${TC_INSTALL_DIR}/lib/tc.jarr:${TC_INSTALL_DIR}/lib/my-secret-provider.jar" \MICROSOFT WINDOWS
Change the lineset CLASSPATH=%TC_INSTALL_DIR%\lib\tc.jarto
set CLASSPATH=%TC_INSTALL_DIR%\lib\tc.jar;%TC_INSTALL_DIR%\lib\my-secret-provider.jarEnsure that the server's configuration includes the <secret-provider> element specifying your implementation:
<security>
  ...
  <keychain>
    <url>/path/to/my/keychain</url>
    <secret-provider>com.foo.MySecretProvider</secret-provider>
  </keychain>
  ...
</security>
At startup, the server will read the keychain password from the file specified in your implementation.
For a simpler solution, you could instead hardcode the password:
    package com.foo;

    import com.terracotta.management.security.SecretProviderBackEnd;

    public class MySecretProvider implements SecretProviderBackEnd {

      // This method returns the byte array containing the password.
      @Override
      public byte[] getSecret() {
        return new byte[] {'p', 'a', 's', 's', 'w', 'o', 'r', 'd'};
      }

      @Override
      public void fetchSecret() {
      }
    }
Clients Automatically Reading the Keychain Password
You can set up Terracotta clients to read their keychain's master password in a similar way as for servers. Import org.terracotta.toolkit.SecretProvider and override fetchSecret() and getSecret() as shown above.
Instead of packaging the implementation in a JAR, specify your implementing class by using the system property com.terracotta.express.SecretProvider.