Open Source
Configuring Terracotta Clusters For High Availability
Introduction
High Availability (HA) is an implementation designed to maintain uptime and access to services even during component overloads and failures. Terracotta clusters offer simple and scalable HA implementations based on the Terracotta Server Array (see Terracotta Server Array Architecture for more information).
The main features of a Terracotta HA architecture include:
- Instant failover using a hot standby or multiple active servers – provides continuous uptime and services
- Configurable automatic internode monitoring – Terracotta HealthChecker
- Automatic permanent storage of all current shared (in-memory) data – available to all server instances (no loss of application state)
Automatic reconnection of temporarily disconnected server instances and clients – restores hot standbys without operator intervention, allows "lost" clients to reconnect
Client reconnection refers to reconnecting clients that have not yet been disconnected from the cluster by the Terracotta Server Array. To learn about reconnecting BigMemory Max clients that have been disconnected from their cluster, see Using Rejoin to Automatically Reconnect Terracotta Clients.
| This document may refer to a Terracotta server instance as L2, and a Terracotta client (the node running your application) as L1. These are the shorthand references used in Terracotta configuration files. |
It is important to thoroughly test any High Availability setup before going to production. Suggestions for testing High Availability configurations are provided in this section.
Basic High-Availability Configuration
A basic high-availability configuration has the following components:
Two or More Terracotta Server Instances
You may set up High Availability using either
<server>or<mirror-group>configurations. Note that<server>instances do work together as a mirror group, but to create more than one stripe, or to configure the election-time, use<mirror-group>instances. See Terracotta Server Arrays Architecture on how to set up a cluster with multiple Terracotta server instances.Server-Server Reconnection
A reconnection mechanism can be enabled to restore lost connections between active and mirror Terracotta server instances. See Automatic Server Instance Reconnect for more information.
Server-Client Reconnection
A reconnection mechanism can be enabled to restore lost connections between Terracotta clients and server instances. See Automatic Client Reconnect for more information.
High-Availability Features
The following high-availability features can be used to extend the reliability of a Terracotta cluster. These features are controlled using properties set with the <tc-properties> section at the beginning of the Terracotta configuration file:
<tc:tc-config xmlns:tc="http://www.terracotta.org/config"
xmlns:xsi="http://www.w3.org/2001/XMLSchema-instance"
xsi:schemaLocation="http://www.terracotta.org/schema/terracotta-9.xsd">

 <tc-properties>
   <property name="some.property.name" value="true"/>
   <property name="some.other.property.name" value="true"/>
   <property name="still.another.property.name" value="1024"/>
 </tc-properties>

<!-- The rest of the Terracotta configuration goes here. -->

</tc:tc-config>
See the section Overriding tc.properties in Configuration Guide and Reference for more information.
HealthChecker
HealthChecker is a connection monitor similar to TCP keep-alive. HealthChecker functions between Terracotta server instances (in High Availability environments), and between Terracotta sever instances and clients. Using HealthChecker, Terracotta nodes can determine if peer nodes are reachable, up, or in a GC operation. If a peer node is unreachable or down, a Terracotta node using HealthChecker can take corrective action. HealthChecker is on by default.
You configure HealthChecker using certain Terracotta properties, which are grouped into three different categories:
- Terracotta server instance -> Terracotta client
- Terracotta Server -> Terracotta Server (HA setup only)
- Terracotta Client -> Terracotta Server
Property category is indicated by the prefix:
- l2.healthcheck.l1 indicates L2 -> L1
- l2.healthcheck.l2 indicates L2 -> L2
- l1.healthcheck.l2 indicates L1 -> L2
For example, the l2.healthcheck.l2.ping.enabled property applies to L2 -> L2.
The following HealthChecker properties can be set in the <tc-properties> section of the Terracotta configuration file:
| Property | Definition |
|---|---|
l2.healthcheck.l1.ping.enabled
l2.healthcheck.l2.ping.enabled
l1.healthcheck.l2.ping.enabled
|
Enables (True) or disables (False) ping probes (tests). Ping probes are high-level attempts to gauge the ability of a remote node to respond to requests and is useful for determining if temporary inactivity or problems are responsible for the node's silence. Ping probes may fail due to long GC cycles on the remote node. |
l2.healthcheck.l1.ping.idletime
l2.healthcheck.l2.ping.idletime
l1.healthcheck.l2.ping.idletime
|
The maximum time (in milliseconds) that a node can be silent (have no network traffic) before HealthChecker begins a ping probe to determine if the node is alive. |
l2.healthcheck.l1.ping.interval
l2.healthcheck.l2.ping.interval
l1.healthcheck.l2.ping.interval
|
If no response is received to a ping probe, the time (in milliseconds) that HealthChecker waits between retries. |
l2.healthcheck.l1.ping.probes
l2.healthcheck.l2.ping.probes
l1.healthcheck.l2.ping.probes
|
If no response is received to a ping probe, the maximum number (integer) of retries HealthChecker can attempt. |
l2.healthcheck.l1.socketConnect
l2.healthcheck.l2.socketConnect
l1.healthcheck.l2.socketConnect
|
Enables (True) or disables (False) socket-connection tests. This is a low-level connection that determines if the remote node is reachable and can access the network. Socket connections are not affected by GC cycles. |
l2.healthcheck.l1.socketConnectTimeout
l2.healthcheck.l2.socketConnectTimeout
l1.healthcheck.l2.socketConnectTimeout
|
A multiplier (integer) to determine the maximum amount of time that a remote node has to respond before HealthChecker concludes that the node is dead (regardless of previous successful socket connections). The time is determined by multiplying the value in ping.interval by this value. |
l2.healthcheck.l1.socketConnectCount
l2.healthcheck.l2.socketConnectCount
l1.healthcheck.l2.socketConnectCount
|
The maximum number (integer) of successful socket connections that can be made without a successful ping probe. If this limit is exceeded, HealthChecker concludes that the target node is dead. |
l1.healthcheck.l2.bindAddress
|
Binds the client to the configured IP address. This is useful where a host has more than one IP address available for a client to use. The default value of "0.0.0.0" allows the system to assign an IP address. |
l1.healthcheck.l2.bindPort
|
Set the client's callback port. Terracotta configuration does not assign clients a port for listening to cluster communications such as that required by HealthChecker. The default value of "0" allows the system to assign a port. To specify a port number or a range of ports, you can provide a port number as the value, or a comma separated list of ports where each element of the list can either be a single number or range. A value of "-1" disables a client's callback port. |
The following diagram illustrates how HealthChecker functions.
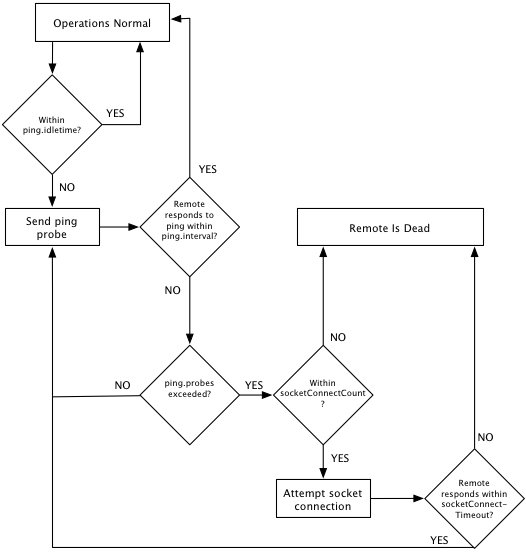
Calculating HealthChecker Maximum
The following formula can help you compute the maximum time it will take HealthChecker to discover failed or disconnected remote nodes:
Max Time = (ping.idletime) + socketConnectCount * [(ping.interval * ping.probes)
           + (socketConnectTimeout * ping.interval)]
Note the following about the formula:
The response time to a socket-connection attempt is less than or equal to
(socketConnectTimeout * ping.interval). For calculating the worst-case scenario (absolute maximum time), the equality is used. In most real-world situations the socket-connect response time is likely to be close to 0 and the formula can be simplified to the following:Max Time = (ping.idletime) + [socketConnectCount * (ping.interval * ping.probes)]ping.idletime, the trigger for the full HealthChecker process, is counted once since it is in effect only once each time the process is triggered.socketConnectCountis a multiplier that is in incremented as long as a positive response is received for each socket connection attempt.- The formula yields an ideal value, since slight variations in actual times can occur.
- To prevent clients from disconnecting too quickly in a situation where an active server is temporarily disconnected from both the backup server and those clients, ensure that the Max Time for L1->L2 is approximately 8-12 seconds longer than for L2->L2. If the values are too close together, then in certain situations the active server may kill the backup and refuse to allow clients to reconnect.
Configuration Examples
The configuration examples in this section show settings for L1 -> L2 HealthChecker. However, they apply in the similarly to L2 -> L2 and L2 -> L1, which means that the server is using HealthChecker on the client.
Aggressive
The following settings create an aggressive HealthChecker with low tolerance for short network outages or long GC cycles:
<property name="l1.healthcheck.l2.ping.enabled" value="true" />
<property name="l1.healthcheck.l2.ping.idletime" value="2000" />
<property name="l1.healthcheck.l2.ping.interval" value="1000" />
<property name="l1.healthcheck.l2.ping.probes" value="3" />
<property name="l1.healthcheck.l2.socketConnect" value="true" />
<property name="l1.healthcheck.l2.socketConnectTimeout" value="2" />
<property name="l1.healthcheck.l2.socketConnectCount" value="5" />
According to the HealthChecker "Max Time" formula, the maximum time before a remote node is considered to be lost is computed in the following way:
2000 + 5 [( 3 * 1000 ) + ( 2 * 1000)] = 27000
In this case, after the initial idletime of 2 seconds, the remote failed to respond to ping probes but responded to every socket connection attempt, indicating that the node is reachable but not functional (within the allowed time frame) or in a long GC cycle. This aggressive HealthChecker configuration declares a node dead in no more than 27 seconds.
If at some point the node had been completely unreachable (a socket connection attempt failed), HealthChecker would have declared it dead sooner. Where, for example, the problem is a disconnected network cable, the "Max Time" is likely to be even shorter:
2000 + 1[3 * 1000) + ( 2 * 1000 ) = 7000
In this case, HealthChecker declares a node dead in no more than 7 seconds.
Tolerant
The following settings create a HealthChecker with a higher tolerance for interruptions in network communications and long GC cycles:
<property name="l1.healthcheck.l2.ping.enabled" value="true" />
<property name="l1.healthcheck.l2.ping.idletime" value="5000" />
<property name="l1.healthcheck.l2.ping.interval" value="1000" />
<property name="l1.healthcheck.l2.ping.probes" value="3" />
<property name="l1.healthcheck.l2.socketConnect" value="true" />
<property name="l1.healthcheck.l2.socketConnectTimeout" value="5" />
<property name="l1.healthcheck.l2.socketConnectCount" value="10" />
According to the HealthChecker "Max Time" formula, the maximum time before a remote node is considered to be lost is computed in the following way:
5000 + 10 [( 3 x 1000 ) + ( 5 x 1000)] = 85000
In this case, after the initial idletime of 5 seconds, the remote failed to respond to ping probes but responded to every socket connection attempt, indicating that the node is reachable but not functional (within the allowed time frame) or excessively long GC cycle. This tolerant HealthChecker configuration declares a node dead in no more than 85 seconds.
If at some point the node had been completely unreachable (a socket connection attempt failed), HealthChecker would have declared it dead sooner. Where, for example, the problem is a disconnected network cable, the "Max Time" is likely to be even shorter:
5000 + 1[3 * 1000) + ( 5 * 1000 )] = 13000
In this case, HealthChecker declares a node dead in no more than 13 seconds.
Tuning HealthChecker to Allow for GC or Network Interruptions
GC cycles do not affect a node's ability to respond to socket-connection requests, while network interruptions do. This difference can be used to tune HealthChecker to work more efficiently in a cluster where one or the other of these issues is more likely to occur:
To favor detection of network interruptions, adjust the socketConnectCount down (since socket connections will fail). This will allow HealthChecker to disconnect a client sooner due to network issues.
To favor detection of GC pauses, adjust the socketConnectCount up (since socket connections will succeed). This will allow clients to remain in the cluster longer when no network disconnection has occurred.
The ping interval increases the time before socket-connection attempts kick in to verify health of a remote node. The ping interval can be adjusted up or down to add more or less tolerance in either of the situations listed above.
Automatic Server Instance Reconnect
An automatic reconnect mechanism can prevent short network disruptions from forcing a restart for any Terracotta server instances in a server array with hot standbys. If not disabled, this mechanism is by default in effect in clusters set to networked-based HA mode.
| This feature increases time-to-failover by the timeout value set for the automatic reconnect mechanism. |
This event-based reconnection mechanism works independently and exclusively of HealthChecker. If HealthChecker has already been triggered, this mechanism cannot be triggered for the same node. If this mechanism is triggered first by an internal Terracotta event, HealthChecker is prevented from being triggered for the same node. The events that can trigger this mechanism are not exposed by API but are logged.
Configure the following properties for the reconnect mechanism:
l2.nha.tcgroupcomm.reconnect.enabled– (DEFAULT: false) When set to "true" enables a server instance to attempt reconnection with its peer server instance after a disconnection is detected. Most use cases should benefit from enabling this setting.l2.nha.tcgroupcomm.reconnect.timeout– Enabled ifl2.nha.tcgroupcomm.reconnect.enabledis set to true. Specifies the timeout (in milliseconds) for reconnection. Default: 2000. This parameter can be tuned to handle longer network disruptions.
Automatic Client Reconnect
Clients disconnected from a Terracotta cluster normally require a restart to reconnect to the cluster. An automatic reconnect mechanism can prevent short network disruptions from forcing a restart for Terracotta clients disconnected from a Terracotta cluster.
| With this feature, clients waiting to reconnect continue to hold locks. Some application threads may block while waiting to for the client to reconnect. |
This event-based reconnection mechanism works independently and exclusively of HealthChecker. If HealthChecker has already been triggered, this mechanism cannot be triggered for the same node. If this mechanism is triggered first by an internal Terracotta event, HealthChecker is prevented from being triggered for the same node. The events that can trigger this mechanism are not exposed by API but are logged.
Configure the following properties for the reconnect mechanism:
l2.l1reconnect.enabled– (DEFAULT: false) When set to "true" enables a client to reconnect to a cluster after a disconnection is detected. This property controls a server instance's reaction to such an attempt. It is set on the server instance and is passed to clients by the server instance. A client cannot override the server instance's setting. If a mismatch exists between the client setting and a server instance's setting, and the client attempts to reconnect to the cluster, the client emits a mismatch error and exits. Most use cases should benefit from enabling this setting.l2.l1reconnect.timeout.millis– Enabled ifl2.l1reconnect.enabledis set to true. Specifies the timeout (in milliseconds) for reconnection. This property controls a server instance's timeout during such an attempt. It is set on the server instance and is passed to clients by the server instance. A client cannot override the server instance's setting. Default: 2000. This parameter can be tuned to handle longer network disruptions.
Special Client Connection Properties
Client connections can also be tuned for the following special cases:
- Client failover after server failure
- First-time client connection
The connection properties associated with these cases are already optimized for most typical environments. If you attempt to tune these properties, be sure to thoroughly test the new settings.
Client Failover After Server Failure
When an active Terracotta server instance fails, and a mirror Terracotta server is available, the mirror server becomes active. Terracotta clients connected to the previous active server automatically switch to the new active server. However, these clients have a limited window of time to complete the failover.
| This reconnection window also applies in a cluster with a single Terracotta server that is restarted. However, a single-server cluster must have <restartable> enabled for the reconnection window to take effect. |
This window is configured in the Terracotta configuration file using the <client-reconnect-window> element:
<servers>
  ...
  <client-reconnect-window>120</client-reconnect-window>
  <!-- The reconnect window is configured in seconds, with a default value of 120.
       The default value is "built in," so the element does not have to be explicitly
       added unless a different value is required. -->
  ...
</servers>
Clients that fail to connect to the new active server must be restarted if they are to successfully reconnect to the cluster.
First-Time Client Connection
When a Terracotta client is first started (or restarted), it attempts to connect to a Terracotta server instance based on the following properties:
# Must the client and server be running the same version of Terracotta?
l1.connect.versionMatchCheck.enabled = true
# Time (in milliseconds) before a socket connection attempt is timed out.
l1.socket.connect.timeout=10000
# Time (in milliseconds; minimum 10) between attempts to connect to a server.
l1.socket.reconnect.waitInterval=1000
The timing properties above control connection attempts only after the client has obtained and resolved its configuration from the server. To control connection attempts before configuration is resolved, set the following property on the client:
-Dcom.tc.tc.config.total.timeout=5000
This property limits the time (in milliseconds) that a client spends attempting to make an initial connection.
Using Rejoin to Automatically Reconnect Terracotta Clients
A Terracotta client may disconnect and be timed out (ejected) from the cluster. Typically, this occurs because of network communication interruptions lasting longer than the configured HA settings for the cluster. Other causes include long GC pauses and slowdowns introduced by other processes running on the client hardware.
You can configure clients to automatically rejoin a cluster after they are ejected. If the ejected client continues to run under nonstop cache settings, and then senses that it has reconnected to the cluster (receives a clusterOnline event), it can begin the rejoin process.
Note the following about using the rejoin feature:
- Disconnected clients can only rejoin clusters to which they were previously connected.
- Clients rejoin as new members and will wipe all cached data to ensure that no pauses or inconsistencies are introduced into the cluster.
- Clients cannot rejoin a new cluster; if the TSA has been restarted and its data has not been persisted, clients can never rejoin and must be restarted.
- If the TSA has been restarted and its data has been persisted, clients are allowed to rejoin.
- Any nonstop-related operations that begin (and do not complete) before the rejoin operation completes may be unsuccessful and may generate a NonStopCacheException.
- If a Terracotta client with rejoin enabled is running in a JVM with clients that do not have rejoin, then only that client will rejoin after a disconnection. The remaining clients cannot rejoin and may cause the application to behave unpredictably.
- Once a client rejoins, the clusterRejoined event is fired on that client only.
Configuring Rejoin
The rejoin feature is disabled by default. To enable the rejoin feature in an Terracotta client, follow these steps:
- Ensure that all of the caches in the Ehcache configuration file where rejoin is enabled have nonstop enabled.
- Ensure that your application does not create caches on the client without nonstop enabled.
Enable the rejoin attribute in the client's
<terracottaConfig>element:<terracottaConfig url="myHost:9510" rejoin="true" />
For more options on configuring <terracottaConfig>, see the configuration reference.
Exception During Rejoin
Under certain circumstances, if a lock is being used by your application, an InvalidLockAfterRejoinException could be thrown during or after client rejoin. This exception occurs when an unlock operation takes place on a lock obtained before the rejoin attempt completed.
To ensure that locks are released properly, application code should encapsulate lock-unlock operations with try-finally blocks:
myLock.acquireLock();
try {
  // Do some work.
} finally {
  myLock.unlock();
}
Effective Client-Server Reconnection Settings: An Example
To prevent unwanted disconnections, it is important to understand the potentially complex interaction between HA settings and the environment in which your cluster runs. Settings that are not appropriate for a particular environment can lead to unwanted disconnections under certain circumstances.
In general, it is advisable to maintain an L1-L2 HealthChecker timeout that falls between the L2-L2 HealthChecker timeout as modified in the following ineqaulity:
L2-L2 HealthCheck + Election Time
        <  L1-L2 HealthCheck
                  <  L2-L2 HealthCheck + Election Time + Client Reconnect Window
This allows a cluster's L1s to avoid disconnecting before a client reconnection window is opened (a backup L2 takes over), or to not disconnect if that window is never opened (the original active L2 is still functional). The Election Time and Client Reconnect Window settings, which are found in the Terracotta configuration file, are respectively 5 seconds and 120 seconds by default.
For example, in a cluster where the L2-L2 HealthChecker triggers at 55 seconds, a backup L2 can take over the cluster after 180 seconds (55 + 5 + 120). If the L1-L2 HealthChecker triggers after a time that is greater than 180 seconds, clients may not attempt to reconnect until the reconnect window is closed and it's too late.
If the L1-L2 HealthChecker triggers after a time that is less than 60 seconds (L2-L2 HealthChecker + Election Time), then the clients may disconnect from the active L2 before its failure is determined. Should the active L2 win the election, the disconnected L1s would then be lost.
A check is performed at server startup to ensure that L1-L2 HealthChecker settings are within the effective range. If not, a warning with a prescription is printed.
Testing High-Availability Deployments
This section presents recommendations for designing and testing a robust cluster architecture. While these recommendations have been tested and shown to be effective under certain circumstances, in your custom environment additional testing is still necessary to ensure an optimal setup, and to meet specific demands related to factors such as load.
High-Availability Network Architecture And Testing
To take advantage of the Terracotta active-mirror server configuration, certain network configurations are necessary to prevent split-brain scenarios and ensure that Terracotta clients (L1s) and server instances (L2s) behave in a deterministic manner after a failure occurs. This is regardless of the nature of the failure, whether network, machine, or other type.
This section outlines two possible network configurations that are known to work with Terracotta failover. While it is possible for other network configurations to work reliably, the configurations listed in this document have been well tested and are fully supported.
Deployment Configuration: Simple (no network redundancy)
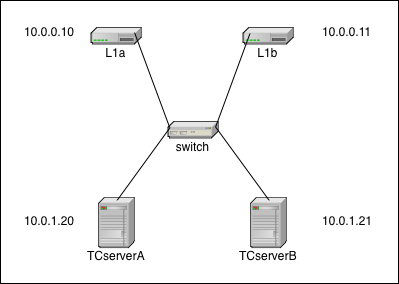
Description
This is the simplest network configuration. There is no network redundancy so when any failure occurs, there is a good chance that all or part of the cluster will stop functioning. All failover activity is up to the Terracotta software.
In this diagram, the IP addresses are merely examples to demonstrate that the L1s (L1a & L1b) and L2s (TCserverA & TCserverB) can live on different subnets. The actual addressing scheme is specific to your environment. The single switch is a single point of failure.
Additional configuration
There is no additional network or operating-system configuration necessary in this configuration. Each machine needs a proper network configuration (IP address, subnet mask, gateway, DNS, NTP, hostname) and must be plugged into the network.
Test Plan - Network Failures Non-Redundant Network
To determine that your configuration is correct, use the following tests to confirm all failure scenarios behave as expected.
| TestID | Failure | Expected Outcome |
|---|---|---|
| FS1 | Loss of L1a (link or system) | Cluster continues as normal using only L1b |
| FS2 | Loss of L1b (link or system) | Cluster continues as normal using only L1a |
| FS3 | Loss of L1a & L1b | Non-functioning cluster |
| FS4 | Loss of Switch | Non-functioning cluster |
| FS5 | Loss of Active L2 (link or system) | mirror L2 becomes new Active L2, L1s fail over to new Active L2 |
| FS6 | Loss of mirror L2 | Cluster continues as normal without TC redundancy |
| FS7 | Loss of TCservers A & B | Non-functioning cluster |
Test Plan - Network Tests Non-redundant Network
After the network has been configured, you can test your configuration with simple ping tests.
| TestID | Host | Action | Expected Outcome |
|---|---|---|---|
| NT1 | all | ping every other host | successful ping |
| NT2 | all | pull network cable during continuous ping | ping failure until link restored |
| NT3 | switch | reload | all pings cease until reload complete and links restored |
Deployment Configuration: Fully Redundant
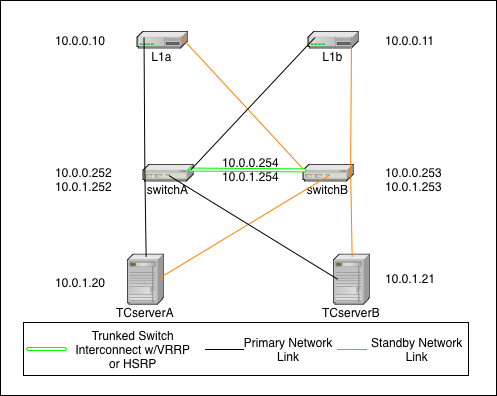
Description
This is the fully redundant network configuration. It relies on the failover capabilities of Terracotta, the switches, and the operating system. In this scenario it is even possible to sustain certain double failures and still maintain a fully functioning cluster.
In this diagram, the IP addressing scheme is merely to demonstrate that the L1s (L1a & L1b) can be on a different subnet than the L2s (TCserverA & TCserverB). The actual addressing scheme will be specific to your environment. If you choose to implement with a single subnet, then there will be no need for VRRP/HSRP but you will still need to configure a single VLAN (can be VLAN 1) for all TC cluster machines.
In this diagram, there are two switches that are connected with trunked links for redundancy and which implement Virtual Router Redundancy Protocol (VRRP) or HSRP to provide redundant network paths to the cluster servers in the event of a switch failure. Additionally, all servers are configured with both a primary and secondary network link which is controlled by the operating system. In the event of a NIC or link failure on any single link, the operating system should fail over to the backup link without disturbing (e.g. restarting) the Java processes (L1 or L2) on the systems.
The Terracotta fail over is identical to that in the simple case above, however both NIC cards on a single host would need to fail in this scenario before the TC software initiates any fail over of its own.
Additional configuration
Switch - Switches need to implement VRRP or HSRP to provide redundant gateways for each subnet. Switches also need to have a trunked connection of two or more lines in order to prevent any single link failure from splitting the virtual router in two.
Operating System - Hosts need to be configured with bonded network interfaces connected to the two different switches. For Linux, choose mode 1. More information about Linux channel bonding can be found in the RedHat Linux Reference Guide. Pay special attention to the amount of time it takes for your VRRP or HSRP implementation to reconverge after a recovery. You don't want your NICs to change to a switch that is not ready to pass traffic. This should be tunable in your bonding configuration.
Test Plan - Network Failures Redundant Network
The following tests continue the tests listed in Network Failures (Pt. 1). Use these tests to confirm that your network is configured properly.
| TestID | Failure | Expected Outcome |
|---|---|---|
| FS8 | Loss of any primary network link | Failover to standby link |
| FS9 | Loss of all primary links | All nodes fail to their secondary link |
| FS10 | Loss of any switch | Remaining switch assumes VRRP address and switches fail over NICs if necessary |
| FS11 | Loss of any L1 (both links or system) | Cluster continues as normal using only other L1 |
| FS12 | Loss of Active L2 | mirror L2 becomes the new Active L2, All L1s fail over to the new Active L2 |
| FS13 | Loss of mirror L2 | Cluster continues as normal without TC redundancy |
| FS14 | Loss of both switches | non-functioning cluster |
| FS15 | Loss of single link in switch trunk | Cluster continues as normal without trunk redundancy |
| FS16 | Loss of both trunk links | possible non-functioning cluster depending on VRRP or HSRP implementation |
| FS17 | Loss of both L1s | non-functioning cluster |
| FS18 | Loss of both L2s | non-functioning cluster |
Test Plan - Network Testing Redundant Network
After the network has been configured, you can test your configuration with simple ping tests and various failure scenarios.
The test plan for Network Testing consists of the following tests:
| TestID | Host | Action | Expected Outcome |
|---|---|---|---|
| NT4 | any | ping every other host | successful ping |
| NT5 | any | pull primary link during continuous ping to any other host | failover to secondary link, no noticable network interruption |
| NT6 | any | pull standby link during continuous ping to any other host | no effect |
| NT7 | Active L2 | pull both network links | mirror L2 becomes Active, L1s fail over to new Active L2 |
| NT8 | Mirror L2 | pull both network links | no effect |
| NT9 | switchA | reload | nodes detect link down and fail to standby link, brief network outage if VRRP transition occurs |
| NT10 | switchB | reload | brief network outage if VRRP transition occurs |
| NT11 | switch | pull single trunk link | no effect |
Terracotta Cluster Tests
All tests in this section should be run after the Network Tests succeed.
Test Plan - Active L2 System Loss Tests - verify Mirror Takeover
The test plan for mirror takeover consists of the following tests:
| TestID | Test | Setup | Steps | Expected Result |
|---|---|---|---|---|
| TAL1 | Active L2 Loss - Kill | L2-A is active, L2-B is mirror. All systems are running and available to take traffic. | 1. Run app 2. Kill -9 Terracotta PID on L2-A (Active) | L2-B(mirror) becomes active. Takes the load. No drop in TPS on Failover. |
| TAL2 | Active L2 Loss - clean shutdown | L2-A is active, L2-B is mirror. All systems are running and available to take traffic. | 1. Run app 2.Run ~/bin/stop-tc-server.sh on L2-A (Active) | L2-B(mirror) becomes active. Takes the load. No drop in TPS on Failover. |
| TAL3 | Active L2 Loss - Power Down | L2-A is Active, L2-B is mirror. All systems are running and available to take traffic | 1. Run app 2. Power down L2-A (Active) | L2-B(mirror) becomes active. Takes the load. No drop in TPS on Failover. |
| TAL4 | Active L2 Loss - Reboot | L2-A is Active, L2-B is mirror. All systems are running and available to take traffic | 1. Run app 2. Reboot L2-A (Active) | L2-B(mirror) becomes active. Takes the load. No drop in TPS on Failover. |
| TAL5 | Active L2 Loss - Pull Plug | L2-A is Active, L2-B is mirror. All systems are running and available to take traffic | 1. Run app 2. Pull the power cable on L2-A (Active) | L2-B(mirror) becomes active. Takes the load. No drop in TPS on Failover. |
Test Plan - Mirror L2 System Loss Tests
System loss tests confirms High Availability in the event of loss of a single system. This section outlines tests for testing failure of the Terracotta mirror server.
The test plan for testing Terracotta mirror Failures consist of the following tests:
| TestID | Test | Setup | Steps | Expected Result |
|---|---|---|---|---|
| TPL1 | Mirror L2 loss - kill | L2-A is active, L2-B is mirror. All systems are running and available to take traffic. | 1. Run app 2. Kill -9 L2-B (mirror) | data directory needs to be cleaned up, then when L2-B is restarted, it re-synchs state from Active Server. |
| TPL2 | Mirror L2 loss -clean | L2-A is active, L2-B is mirror. All systems are running and available to take traffic | 1. Run app 2. Run ~/bin/stop-tc-server.sh on L2-B (mirror) | data directory needs to be cleaned up, then when L2-B is restarted, it re-synchs state from Active Server. |
| TPL3 | Mirror L2 loss -power down | L2-A is active, L2-B is mirror. All systems are running and available to take traffic | 1. Run app 2. Power down L2-B (mirror) | data directory needs to be cleaned up, then when L2-B is restarted, it re-synchs state from Active Server. |
| TPL4 | Mirror L2 loss -reboot | L2-A is active, L2-B is mirror. All systems are running and available to take traffic | 1. Run app 2. Reboot L2-B (mirror) | data directory needs to be cleaned up, then when L2-B is restarted, it re-synchs state from Active Server. |
| TPL5 | Mirror L2 loss -Pull Plug | L2-A is active, L2-B is mirror. All systems are running and available to take traffic | 1. Run app 2. Pull plug on L2-B (mirror) | data directory needs to be cleaned up, then when L2-B is restarted, it re-synchs state from Active Server. |
Test Plan - Failover/Failback Tests
This section outlines tests to confirm the cluster ability to fail-over to the mirror Terracotta server, and fail back.
The test plan for testing fail over and fail back consists of the following tests:
| TestID | Test | Setup | Steps | Expected Result |
|---|---|---|---|---|
| TFO1 | Failover/Failback | L2-A is active, L2-B is mirror. All systems are running and available to take traffic | 1. Run application 2. Kill -9 (or run stop-tc-server) on L2-A (Active) 3. After L2-B takes over as Active, start-tc-server on L2-A. (L2-A is now mirror) 4. Kill -9 (or run stop-tc-server) on L2-B. (L2-A is now Active) | After first failover L2-A->L2-B, txns should continue. L2-A should come up cleanly in mirror mode when tc-server is run. When second failover occurs L2-B->L2-A, L2-A should process txns. |
Test Plan - Loss of Switch Tests
{tip} This test can only be run on a redundant network {tip}
This section outlines testing the loss of a switch in a redundant network, and confirming that no interrupt of service occurs.
The test plan for testing failure of a single switch consists of the following tests:
| TestID | Test | Setup | Steps | Expected Result |
|---|---|---|---|---|
| TSL1 | Loss of 1 Switch | 2 Switches in redundant configuration. L2-A is active, L2-B is mirror. All systems are running and available to take traffic. | 1. Run application 2. Power down/pull plug on Switch | All traffic transparently moves to switch 2 with no interruptions |
Test Plan - Loss of Network Connectivity
This section outlines testing the loss of network connectivity.
The test plan for testing failure of the network consists of the following tests:
| TestID | Test | Setup | Steps | Expected Result |
|---|---|---|---|---|
| TNL1 | Loss of NIC wiring (Active) | L2-A is active, L2-B is mirror. All systems are runnng and available to traffic | 1. Run application 2. Remove Network Cable on L2-A | All traffic transparently moves to L2-B with no interruptions |
| TNL2 | Loss of NIC wiring (mirror) | L2-A is active, L2-B is mirror. All systems are runnng and available to traffic | 1. Run application 2. Remove Network Cable on L2-B | No user impact on cluster |
Test Plan - Terracotta Cluster Failure
This section outlines the tests to confirm successful continued operations in the face Terracotta Cluster failures.
The test plan for testing Terracotta Cluster failures consists of the following tests:
| TestID | Test | Setup | Steps | Expected Result |
|---|---|---|---|---|
| TF1 | Process Failure Recovery | L2-A is active, L2-B is mirror. All systems are runnng and available to traffic | 1. Run application 2. Bring down all L1s and L2s 3. Start L2s then L1s | Cluster should come up and begin taking txns again |
| TF2 | Server Failure Recovery | L2-A is active, L2-B is mirror. All systems are runnng and available to traffic | 1. Run application 2. Power down all machines 3. Start L2s and then L1s | Should be able to run application once all servers are up. |
Client Failure Tests
This section outlines tests to confirm successful continued operations in the face of Terracotta client failures.
The test plan for testing Terracotta Client failures consists of the following tests:
| TestID | Test | Setup | Steps | Expected Result |
|---|---|---|---|---|
| TCF1 | L1 Failure - | L2-A is active, L2-B is mirror. 2 L1s L1-A and L1-B All systems are running and available to traffic | 1. Run application 2. kill -9 L1-A. | L1-B should take all incoming traffic. Some timeouts may occur due to txns in process when L1 fails over. |